

As America’s favorite sports car, the Corvette can be found in a variety of forms these days, from stock daily drivers and factory-correct weekend cruisers to blown track cars and nearly unbeatable autocross beasts. But the essence of each car is the same – it’s still a Corvette and it’s still the apple of each and every owner’s eye.
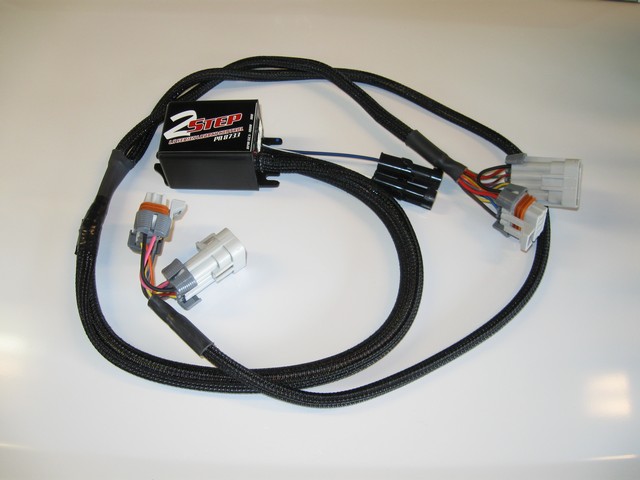
Wanting to take full advantage of what our “Y2K” 2000 Corvette project car has to offer, we opted to elevate it to a higher-than-factory calling, one that would leave stock performance in the dust. Corvette Central Stage 1 through 4 upgrades have given Y2K 385 ponies to the rear wheels and 372 foot pounds of torque to play with, but there’s no use in having power if you can’t take advantage of every ounce of it on the track. That’s why we decided to equip Y2K with a MSD LS 2-Step Launch Control. Easy installation matched with consistent results at the drag strip made the MSD 2-Step an easy choice for the next performance upgrade for our Vette.
It's hard to imagine that this simple system could be the only thing standing between you and better launches at the dragstrip, but less concentration needed to maintain your engine's RPM level and more attention on the lights can make a night and day difference when it comes to launch consistency and 60-foot times.
I’d say an average car guy could install the 2-Step in a couple hours – Todd Ryden

What It Offers
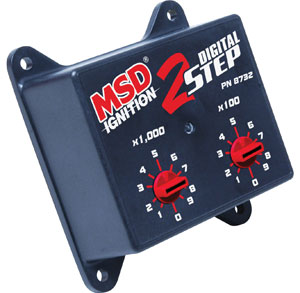
A consistent RPM limit for track launches is just two adjustment dials away with the LS 2-Step Launch Control system.
Consistency at the drag strip is everything, especially when it comes to your launches. So we talked to Todd Ryden at MSD to see what kind of consistency advantages the LS 2-Step Launch Control provides.
“The unit is designed to provide a consistent launch RPM resulting in quicker launches and overall consistency to ETs,” Ryden explains. “As the Christmas tree comes down, having the RPM limited allows a racers to concentrate on the bulbs to improve their reaction time. Also, they don’t need to worry about watching the Tach and trying to hold the engine at a steady RPM.”
Installing the 2-Step
While installing some performance upgrades can take a lot of time and work, hooking up our MSD 2-Step Launch Control was very quick and easy. In fact, it took us less than an hour.
“I’d say an average car guy could install the 2-Step in a couple hours,” said Ryden. ” [It] depends on how detail oriented they want to be on the wiring.”


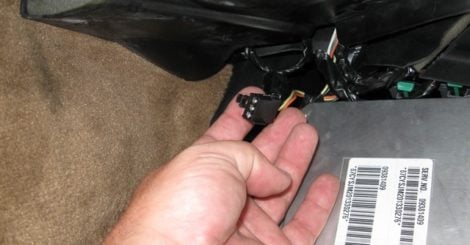
The MSD LS 2-Step Launch Control is plug and play for easy installation. Simple never looked better!
Because the MSD 2-Step is plug and play, connecting it to Y2K’s wiring harness was as simple as plugging the coil harness and coil pack factory-style connectors into the two factory connector ends. To do this, all we had to do was disconnect the factory connector and plug the two connectors on the MSD 2-Step Launch Control into the factory adapters. What’s great about this easy connection is there’s no splicing necessary to make it work.
“The advantage of plug and play is not having to tear into a late model vehicle’s wiring harness,” according to Ryden. “That, and the fact that you can easily remove the unit if the car is sold.”
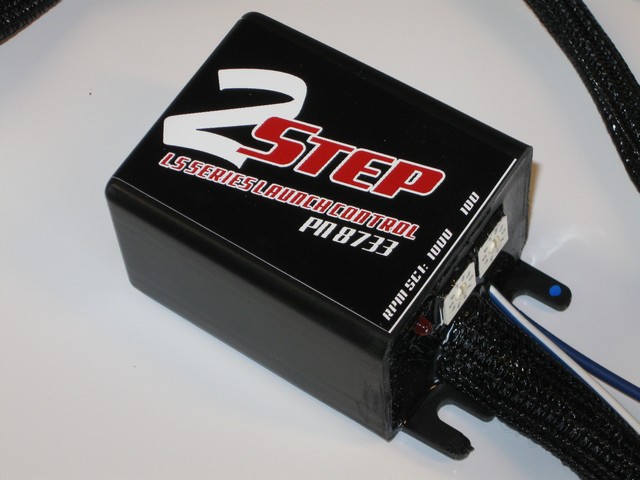
Lugs on the 2-Step's housing makes mounting the unit wherever you want easy and convenient.
Mounting the MSD 2-Step Launch Control box in Y2k’s engine bay was just as simple as connecting it to the wiring harness.
Because the Launch Control box has built-in lugs, it can be mounted to any convenient surface using four screws. We decided to mount our Launch Control box right next to the battery in order to have easy access to the RPM adjustment dials on the end.
The box can be placed virtually anywhere you’d like, just as long as you can access it for future tuning needs.
From there, we used the blue and white wire on the Launch Control designed for switched rather than grounded activation and some extra wire to connect our system to our activation switch. The unit can be activated either by providing a +12v signal on the blue and white wire (as we’re doing), or by connecting the solid blue wire to a ground through a switch.
While this switch can be wired in a few different ways, such as with a momentary button that has to be depressed to activate the system, we opted for our system to activate when the clutch pedal was fully depressed.
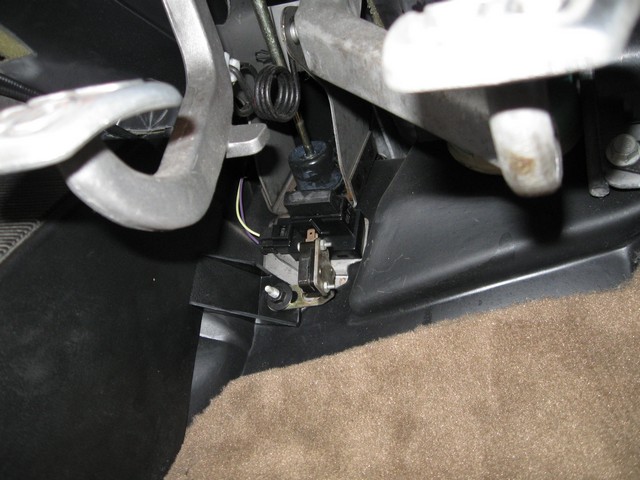
Instead of a manual activation switch, we opted for a clutch activation switch. This way, our 2-Step Launch Control will be active precisely when we need it to be without worrying about extra buttons.
To do this, we repurposed a nitrous activation switch, which we attached under our clutch pedal and wired to the 2-Step Launch Control through the firewall, to act as our Launch Control activation point. This way, when the clutch pedal is fully depressed, it will engage the microswitch and activate our system.
While clutch pedal activation is very convenient and eliminates the need to depress and release a hand button while launching, it could cause problems when using the clutch to shift. Fortunately, MSD took this into consideration with their 2-Step Launch Control.
In order for the 2-Step system to reactivate, it must see at least a 1/3 drop in RPM level.
For example, if you have your Launch Control set at 3,000 RPM, it won’t reactivate unless your RPM level drops below 2,000 RPM. By having this feature integrated into the system, you are able to shift without issue even with a clutch activation switch.
You also don’t have to worry about having a 2-Step on your vehicle if you’re going to be doing street driving, according to Ryden. “Just don’t use it at every stop light!”

Arming our 2-Step Launch Control is simple using an in-dash rocker switch we already had in place. To power this switch, we just tapped into the extra 12v connector found in all C5 passenger kick panels.

If you own a car that’s not powered by an LS, MSD also offers 2-Step Launch Control systems for other popular engines like the new Ford 5.0L, as well as options for cars with distributors.
The Ford 2-Step offers the same great features as the LS 2-Step, like the plug and play design, large range adjustability with simple RPM limiter dials, and the ability to be triggered manually or by using a clutch switch. We’re definitely enjoying the Ford 2-Step on our 2011 Mustang GT project car as we continue to aim for our 10-second quarter mile goal.
For cars with distributors, MSD offers a line of ignition controls, such as the 6AL line that can be paired with a their 2-Step Rev Control or 2-Step Module Selector. Both of these options allow for a high speed rev limiter to be determined on your car as well as a launch rev limiter, no matter if your have a four-cylinder, six-cylinder or eight-cylinder engine.
Once rocked to the “ON” position, this switch will now arm our 2-Step Launch Control system and allow for clutch pedal activation on the track.
In order to power the 2-Step, we needed to find a 12 volt connection to plug it in to. Luckily, Chevrolet graciously puts an extra 12v plug in the passenger side kick panel of all C5 Corvettes specifically for supplying constant and/or switched 12v power. By plugging our system into this connector, our MSD 2-Step Launch Control was ready to test.
Setting Our RPM Limiter and Testing Our New Launch Control
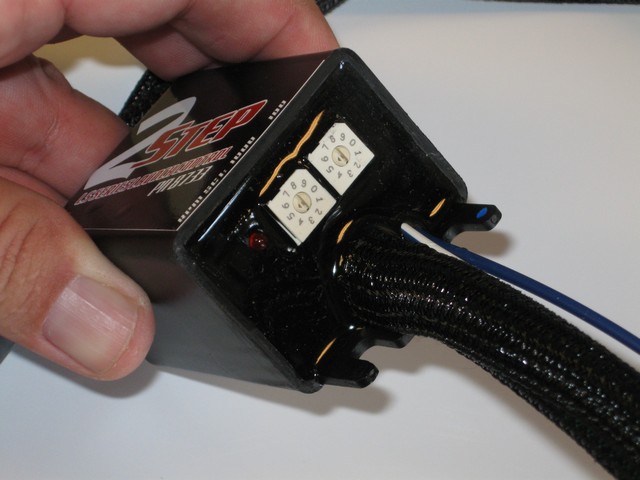
In order to set your desired RPM limit, the MSD 2-Step Launch Control has two dials on the end of the housing, one for increments of 1000 RPM and the other for increments of 100 RPM.
For testing purposes, we decided to set our Launch Control setting to 2,500 RPM. Using a flat-head screw driver, we turned the dials so they read accordingly. After setting our RPM limit where we wanted it, it was off to test our new system.
The MSD 2-Step Launch Control has a built-in LED light right on the housing that lets you know if your system is activated or not. This light also helps in testing the 2-Step Launch Control because if it’s not hooked up properly, the light will not illuminate.

2,500 RPM is a bit low for our application but for testing purposes, it worked out great. Once we get a few more things tuned on Y2K and take her to the track again, you can be sure that we'll be making adjustments to our 2-Step's limit to get the best results possible.
With Y2K running and our rocker switch turned on, we depressed the clutch pedal to check if our system was functioning properly. Sure enough, the LED light illuminated, giving us the thumbs up to take her to the track. And as they say, the rest was history. To hear the MSD 2-Step Launch Control in action, check out the video below.


