 [1]Our new project is a beautiful, bright-red C5 Corvette that’s destined to find a home turning corners in autocross events, along with plenty of time tearing up the local open track days. And since we can’t ever leave well enough alone, the decision was made to start upgrading items in stages, and the first round (as it should be) includes more power with the help of the guys at COMP Cams [2] and F.A.S.T. [3]
The aluminum-block LS architecture introduced in our 1997 C5 was the first move away from the original GM small-block design, and features a hydraulic roller crank, distributorless coil-per-plug ignition, and factory internals proven to handle power upgrades with grace and reliability.
 [4]
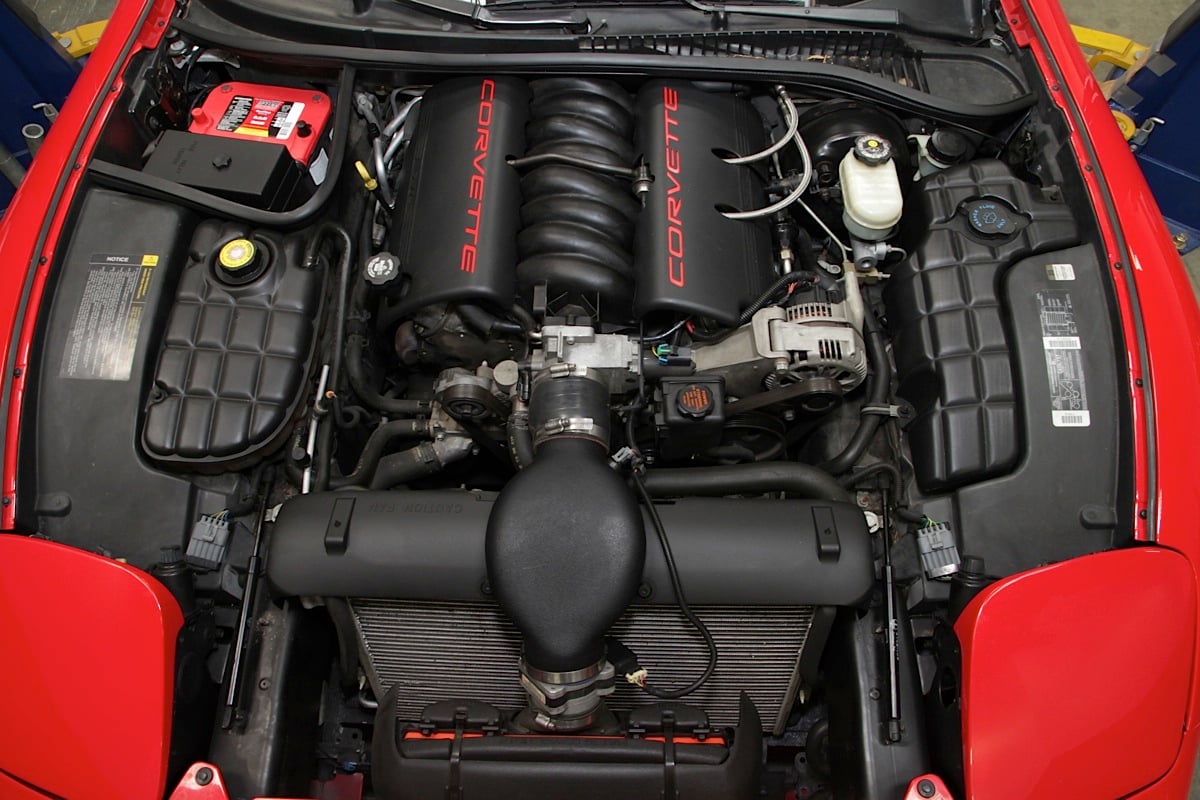
[4]Here’s what we started with – a bone-stock LS1 engine nestled snugly between the framerails of our ‘Vette.
These advances in technology along with a relative low cost have made the LS engine extremely popular in the aftermarket, used in engine swaps for all types of vehicles with many different uses.
More than Dyno Numbers
We’re not looking to make our C5 a dragstrip stormer, so instead of throwing a huge blower or turbocharger at the project, building power and torque across a wide RPM range was deemed more important. Autocross events and open track events make use of the entire powerband from start to finish, instead of operating in a narrow range, so we looked at the COMP catalog to find a camshaft that would serve our needs properly without hurting power or torque at either end of the spectrum.
 [5]
[5] [6]
[6] [7]
[7]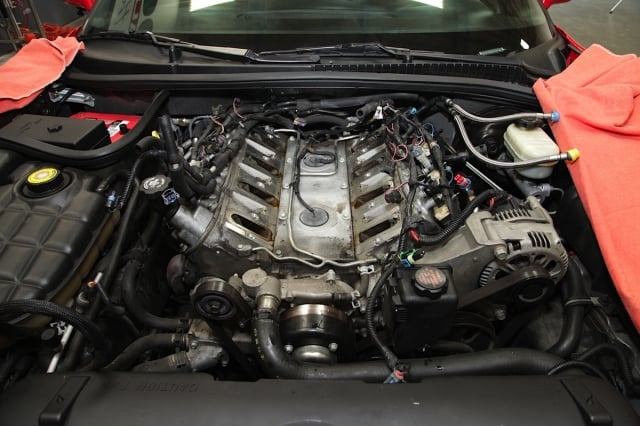 [8]
[8]
Left - Removing the factory air inlet tube is the first step to an intake swap. Left Middle - Unplug the throttle body and all harness connections that run to the manifold. Right middle - Disconnect the fuel lines (you'll need the appropriate tool for this) and unbolt all of the manifold bolts. Right - Out with the old, in with the new. New o-ring gaskets are supplied with the new F.A.S.T. LSX manifold.
COMP Cams [2]‘ line of XFI RPM High Lift hydraulic roller camshafts is designed to provide great street manners while retaining a wide powerband and good drivability. Our LS1 engine was delivered from the factory with a 345-horsepower rating at the crank, and our upgrades will push us up quite a bunch from that.
 [9]
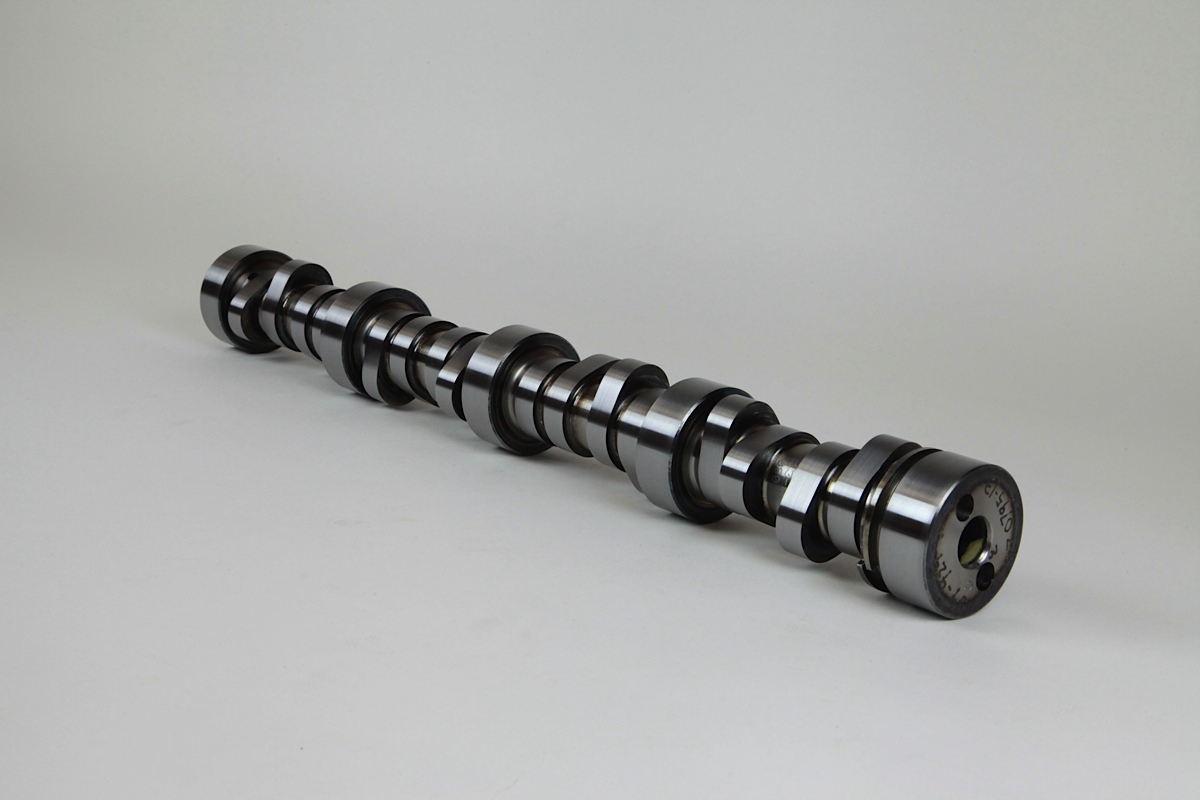
[9]Our COMP Cams XFI RPM High Lift hydraulic roller camshaft, sporting lift figures of .558-inch intake and .563-inch on the exhaust, with 212I/218E degrees of duration.
Bumpstick Basics
The camshaft we selected, the XR265HR-15 [PN 54-424-11 [10]], has an effective powerband of 1,400 to 6,700 RPM, meaning that no matter where we are when the throttle is hammered, the engine should respond with excellent performance. Lift figures at the valve are .558-inch on the intake side and .563-inch on the exhaust side.
The cam provides 212 degrees of intake duration at .050-inch lift, and 218 degrees of exhaust duration at the same measurement. Lobe separation measures in at 115 degrees, and the intake centerline is also positioned at 115 degrees. This dual-pattern camshaft has been scienced out by dozens of hours of testing on COMP Cams’ dyno.
“Basically, that same goal of responsiveness and mid-range that feels so great in a street build also performs best in tight to intermediate course road racing,” says Billy Godbold, COMP Cams’ Valvetrain Engineering Group Manager. “In both, any transient stumble is the kiss of death. This XE is our best seller for a clear reason. In any street or road course application, that cam will make you think the engine has far more power by how it responds to throttle changes than the chassis dyno or quarter mile ET might measure.”
With the use of this camshaft, a new set of valve springs and pushrods are also highly recommended in order to take advantage of the altered timing events. It’s also just smart to replace the stockers, which are in the middle of their second decade of service and deserve to be retired before they have a chance to cause mischief.
We installed our camshaft straight up, although Godbold says there is a bit to be gained by advancing the camshaft a few degrees in terms of responsiveness. Since we didn’t have the heads off the car to check piston-to-valve clearance, we opted to leave it straight up for now, and will address that at a later time should we deem it necessary.
 [11]
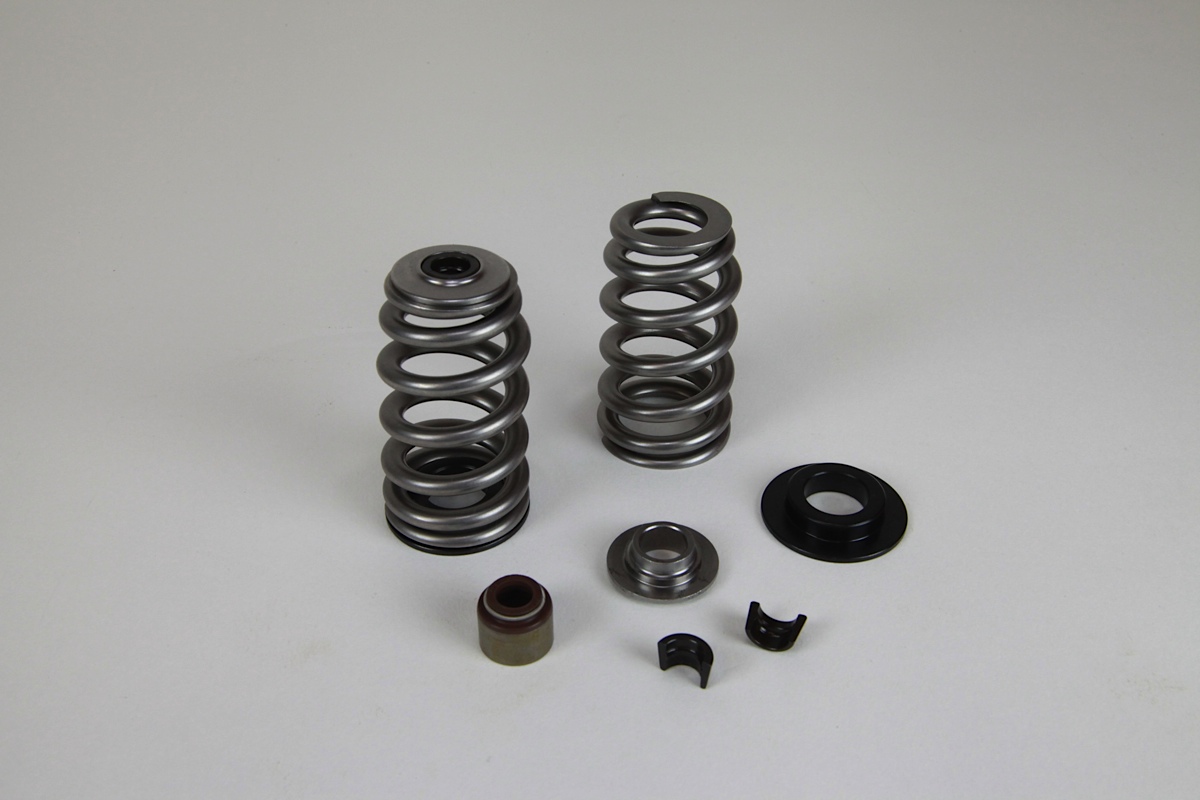
[11]Our new Beehive springs are designed to handle the lift with a single-spring package – this keeps valvetrain weight down but adds durability and performance, and solves the problem of spring resonance.
Spring into Action
The LS engine relies on a beehive spring design to cut down weight while retaining strength and durability, and the COMP Beehive spring kit we selected [PN 26918TS-KIT [12]] is a single spring kit that’s capable of handling up to .625-inch lift for LS1, LS2, and LS6 engines. Beehive valve springs are known to offer increased valvetrain stability and reduced weight in both the spring and retainer over a comparable conventional spring.
In any street or road course application, that cam will make you think the engine has far more power by how it responds to throttle changes. – Billy Godbold, COMP Cams

The Beehive’s shape allows the user to run less spring pressure and as a result offers better valve control by being more efficient. They also increase the high-RPM horsepower by handling the valvetrain stresses in a manner that helps to eliminate damaging harmonic issues.
The Beehive spring wire is oval-shaped and follows more than one arc, placing the largest-diameter wire in the area of highest stress, which allows the rest of the spring to be sized properly to permit better heat dissipation.
As a result, cam profiles can be a bit more aggressive and survive higher RPM loads without increasing valvetrain weight.
 [13]
[13]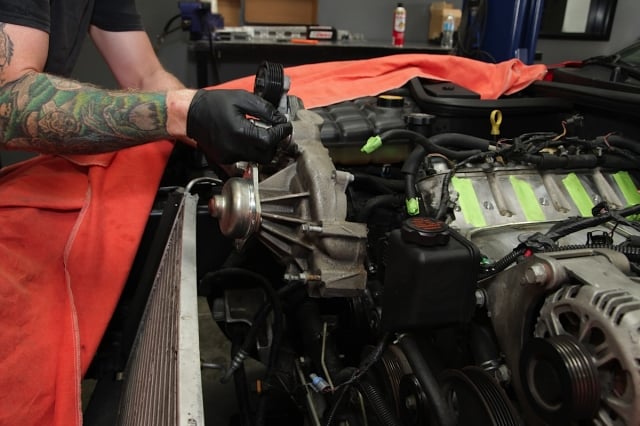 [14]
[14]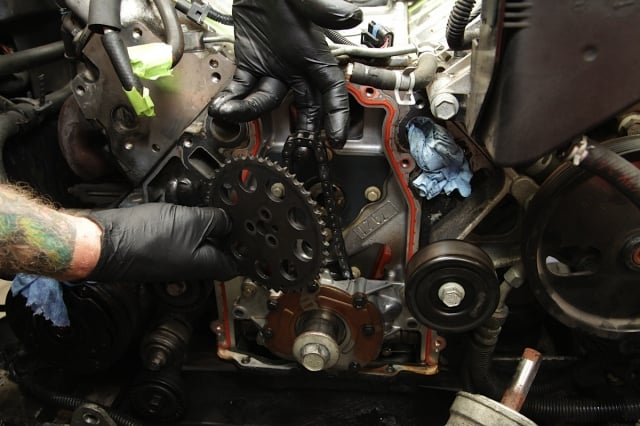 [15]
[15]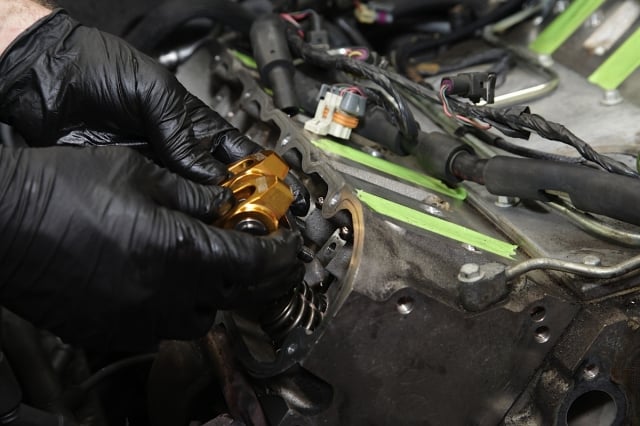 [16]
[16]
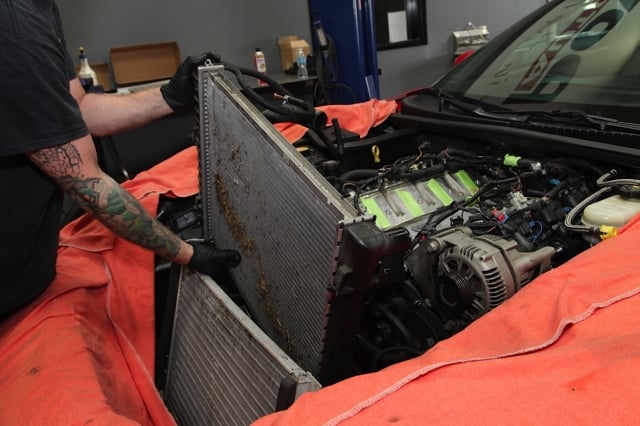
Left - Once we had the intake manifold removed, the radiator, fans, and A/C condenser need to come out first. Left Middle - Once those items are out of the way, the water pump and damper can be removed to access the timing cover. Right Middle - The cover comes off, three bolts are removed from the stock camshaft gear, and the timing assembly can come out of the car. Right - We also pulled the valve covers to get to our previously-installed COMP Gold rocker arms to remove them, then the pushrods in preparation for camshaft removal and reassembly.
Strength in the pushrod is one of the most important requirements of a performance overhead-valve engine, as a weak pushrod can cause timing events to occur erratically or worse, failing under the most extreme conditions the engine sees – high RPM.
COMP’s Hi-Tech pushrods [PN 7955-16 [17]] are constructed from one-piece 5/16-inch diameter .080-inch-wall seamless chromoly tubing. They have precision-formed and reinforced ends to keep the critical tip area strong, while the heat-treating that’s applied helps to provide extended durability and guide-plate compatibility with the stock cylinder heads. Then, they are ground on the outer diameter for consistent sizing and finished with a black oxide treatment.
 [18]
[18]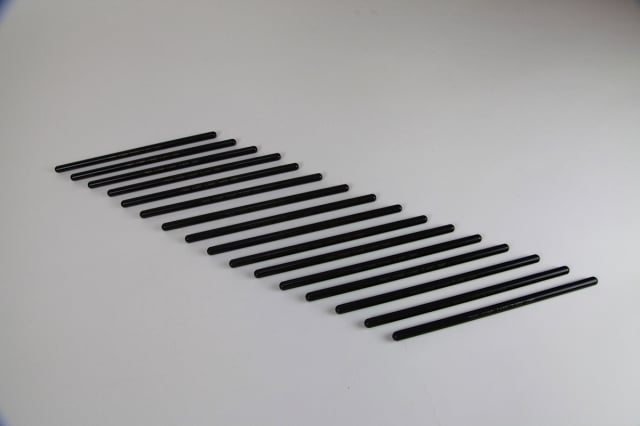 [19]
[19]
Left - Stock valve spring on the left, new COMP Cams Beehive spring and titanium retainer on the right. We used the titanium retainers in the interest of removing even more weight from the valvetrain assembly. Right - Sixteen brand-new, 7.400-inch COMP Cams Hi-Tech one-piece pushrods found a home in our engine.
While We’re In There…
Since we’re tearing into the engine to remove the camshaft, a new timing chain is always a worthy upgrade at this time. There’s no sense in pulling everything apart and reinstalling the factory timing chain – who knows what sort of abuses the OEM parts have seen over the course of their lifespan?
 [20]
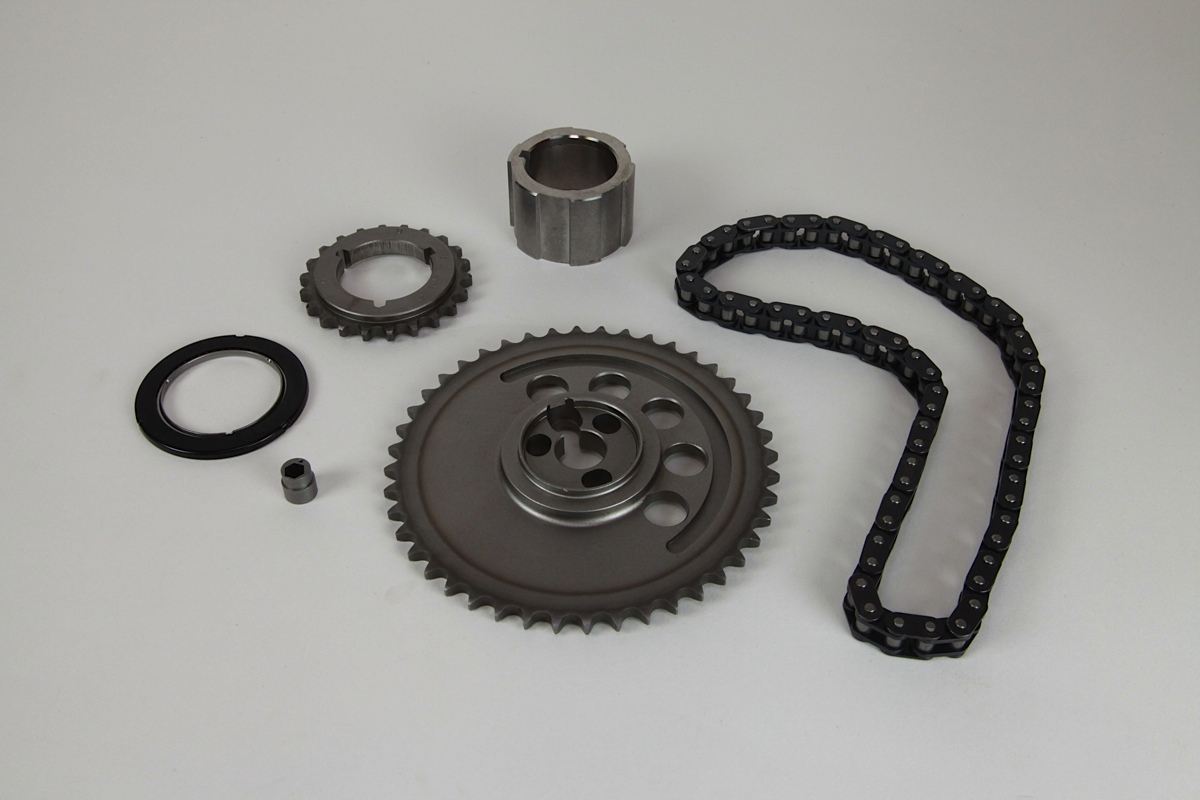
[20]The new COMP Cams Adjustable Timing Set uses a high-strength single roller chain and billet gears.
The COMP Cams Adjustable Timing Set [PN 3158KT [21]] we chose features induction-hardened steel billet gears to provide durability.
The camshaft sprocket is infinitely adjustable and offers 6 degrees of advance and retard. The crankshaft sprocket has three keyways that provide an additional 4 degrees of incremental adjustability.
In addition, there is a heat-treated single-roller chain that has a heavy-duty large pin design for strength and a Torrington roller thrust bearing that helps to reduce friction – which is the last thing you want in your valvetrain.
 [22]
[22] [23]
[23]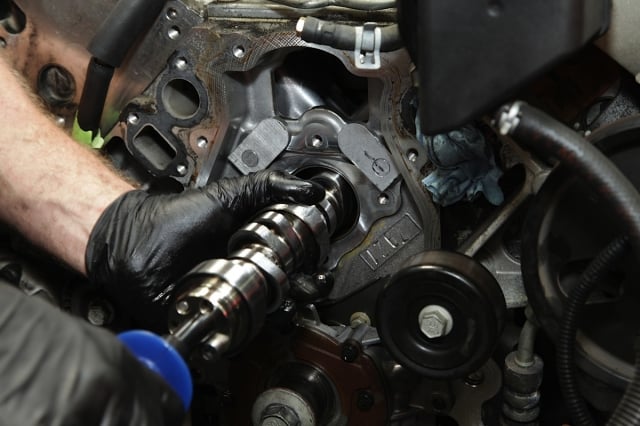 [24]
[24] [25]
[25]
Left - Once the timing cover is removed, the old camshaft comes out easily. We're using these nifty tools to hold the lifters out of the way of the cam lobes. Left Middle - Old cam versus new cam. Right Middle - Lube it up, and the new camshaft slides right into place. Right - Cam in place with our new adjustable timing set installed. Note the spacer that goes on the crankshaft in front of the crank sprocket.
Now that we’ve got the camshaft figured out, it’s time to head to the top side of the engine, where we decided more airflow would be a huge help in allowing our engine to breathe and properly supply the new camshaft with enough flow to make more power.
 [26]
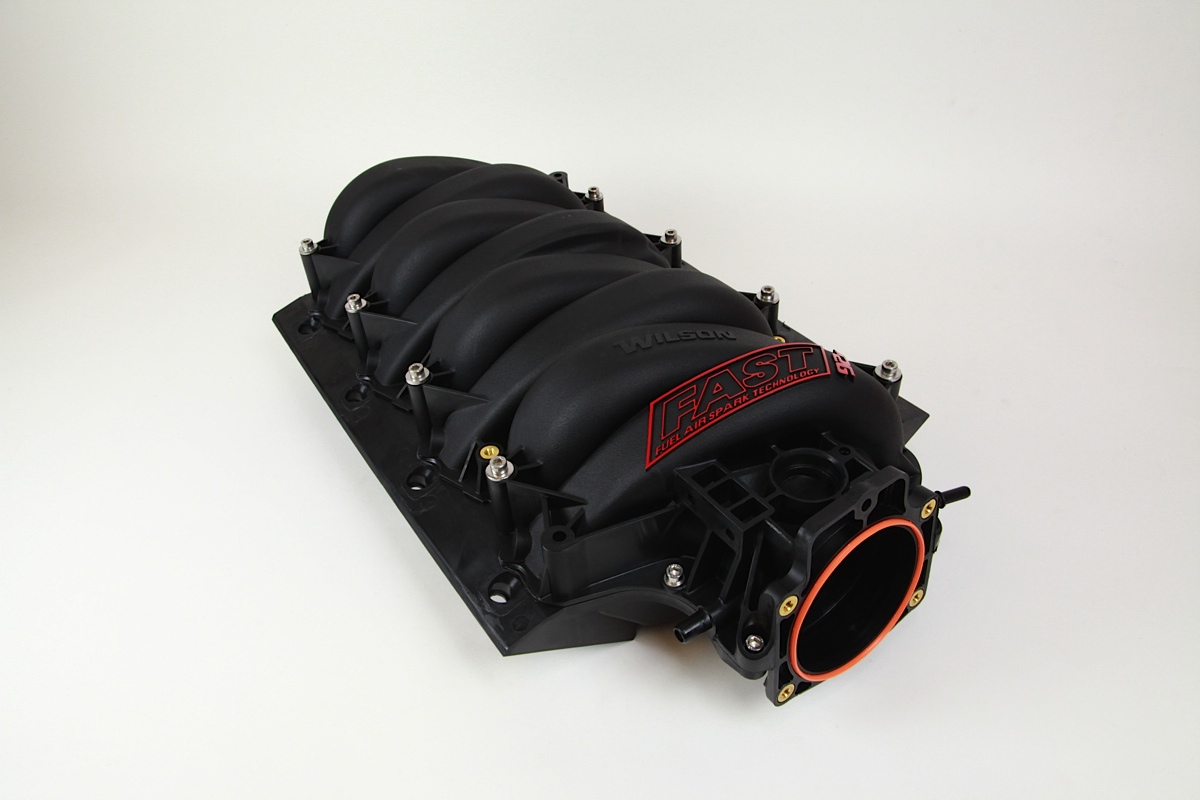
[26]We picked up one of F.A.S.T.’s LSX Manifolds to increase airflow into the cylinder heads and feed our new camshaft all it can handle. A new set of billet fuel rails and an OEM throttle body adapter are also on the menu.
More Air, More Power
This is where the geniuses at F.A.S.T. [3] come in. The LSX Intake manifold [PN 54039B [27]] fits all cathedral port cylinder heads on the LS1, LS2, and LS6 engines and is the only three-piece GENIII composite manifold that has been proven to increase horsepower without sacrificing low-end drivability or high-end power – perfect for our autocross/open track beast. The best part? It’s an easy bolt-on installation.
 [28]
[28]The F.A.S.T. LSX manifold incorporates a 92mm inlet and three-piece construction for easy porting.
The slick black composite manifold features a 92mm throttle body opening that’s designed to work with F.A.S.T.’s Big Mouth 92mm throttle body but will also accept the OEM throttle body as used in our application. It has an improved throttle body sealing flange and O-ring gasket. All-new stainless steel bolts to go with the threaded-insert throttle-body mounts and mounting hardware are included in the kit.
The LSX Intake is built from a high-quality polymer composite that helps to reduce the heat-sink effect of aluminum manifolds, providing a cooler and denser air charge into the cylinder head. Since the manifold is built from three-piece construction, it can be taken apart and ported inside to match up with a set of ported cylinder heads if that’s your desire. It has been designed in conjunction with Wilson Manifolds, one of the leaders in aftermarket airflow management.
 [29]
[29] [30]
[30]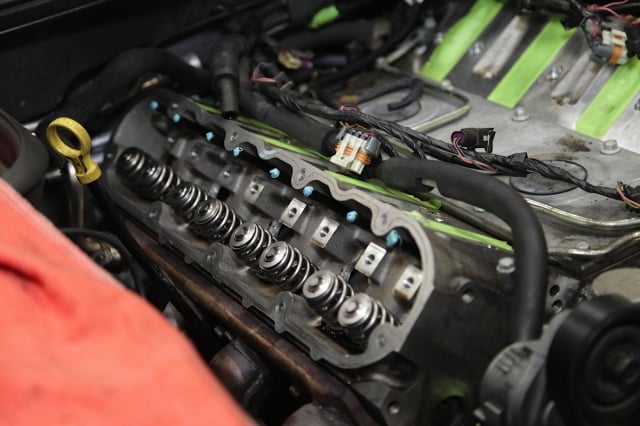 [31]
[31] [32]
[32]
Left - We used this nifty little tool to compress the valve springs one pair at a time, then swapped them out carefully. Left Middle - Make sure to lubricate each end of the pushrod before dropping them into place and reinstalling the rocker arms. Right Middle - Eight little soldiers, all lined up and ready to get to work. Right - New valve cover gaskets are a recommended item at this step of the operation. After the covers are replaced, you can reinstall the fans, condenser, and radiator.
Since we’re using the factory throttle body (for now), we also needed to dig into the F.A.S.T. catalog for one of their OEM Throttle Body Adapter Kits [PN 146029-KIT [33]] to help our factory three-hole throttle body match up with the four holes in the LSX manifold. It includes a CNC-machined plate with three studs that the factory throttle body mounts to, and four machine screws that insert into the manifold’s mounting holes. New hardware is supplied with the adapter plate as well.
F.A.S.T.’s Kevin Winstead tells us, “This manifold was developed in conjunction with the team at Wilson Manifolds [34], and has robust internal sections that allow for porting. It gives an instant horsepower and torque improvement over the factory manifold. It offers much better cylinder-to-cylinder distribution that’s achieved by properly located full-size port openings that helped us to optimize the airflow.”
Top Fuel
The last item on our upgrade list for this segment of the build is a sweet set of F.A.S.T.’s Billet Fuel Rail Kits for the LSX manifold [PN 54023 [35]]. A larger internal diameter is used to help dampen fuel pulses that can occur with the factory small-diameter rails, and an additional benefit is the increased fuel volume that ensures the injectors won’t run dry due to an increased fuel requirement.
 [36]
[36] [37]
[37] [38]
[38] [39]
[39]
Left - The new LSX manifold comes with brand-new port gaskets that press into recesses in the manifold. Left Middle - Reinstallation of the manifold reverses the process of removal. Right Middle - We installed the throttle body adapter plate, which also has a brand-new o-ring style gasket to seal the throttle body. Right - All buttoned up with a brand new manifold/fuel rail combo, camshaft, springs and pushrods to go with our fresh timing set.
The larger diameter design also helps to provide better fuel distribution and ultimately support higher horsepower levels than the factory rail. The rails are finished in a sweet red anodized color, and the kit includes black anodized -8AN fittings and “super seal” o-rings to prevent blowout and leaks. As with the rest of the products we selected, stainless mounting hardware is included in the kit for long life, corrosion resistance, and good looks.
What Did We Get Out Of It?
“When I acquired the car it had a turbo kit on it that was plagued with issues,” says car owner Jason Snyder. “I had the turbos removed and put the car back to stock. The drivability was greatly improved, however, driving a stock Corvette with only 33,000 miles isn’t my style. I wanted to increase the power in its naturally aspirated capacity.”
“My goals for the car were to have a smooth idle, a smooth, linear power and torque curve, and good mid-range/top-end power for open track driving. The end results are exactly what I wanted. After the installation we pulled the valve train and intake upgrades together thanks to a custom tune by Ryne Cunningham of Cunningham Motorsports [40]; the car retained the great low end torque that the GEN 3 LS1’s are known for, and from 3,500-6,500 RPM the car pulls stronger without laying over on the top end. This package won’t break the bank and there is room for more power with a future, more aggressive cam and head upgrade.”
 [41]
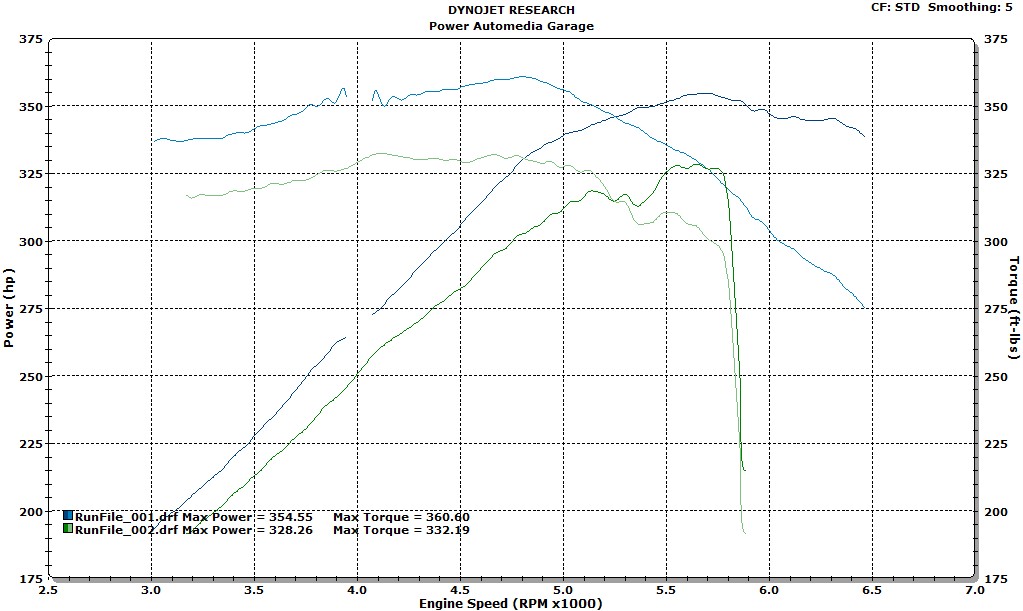
[41]Peak horsepower went from 328.2 to 354.5, and torque climbed from 332.1 pound-feet to 360.6, increases of 26.2 and 28.4 respectively.
As you can see from the dyno results above, we picked up 26.2 horsepower and 28.4 pound-feet of torque at the peak. That’s a nice statistic, but more importantly, you can see that our changes resulted in huge gains all the way across the board. The broad power increase will serve us well on the autocross course, placing more of the engine’s usable power in the hands of our driver.
We also gained more than 500 RPM at the top of the powerband with the revamped engine finally starting to tail off around 6,500, where before it was giving up shy of 6,000 RPM. That, in our opinion, is a win for everyone. The next installment in this series will detail the installation of a brand-new twin-disc clutch from SPEC [42], so stay tuned over the next few weeks as we continue the modification list on our C5!